Posts

Showing posts from 2013

Tranfer animation between blender and maya

Image
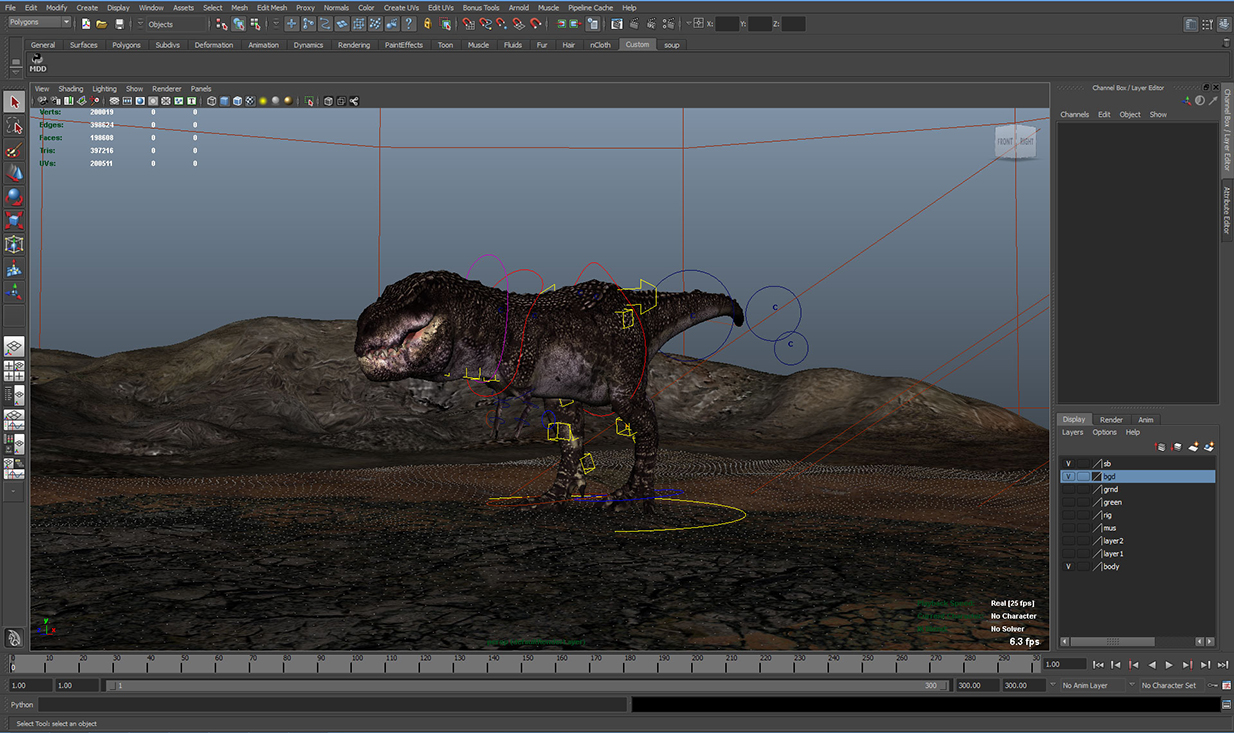
Tranfer animation between blender and maya Now I'll show you a way to transfer animation between maya and blender. Until now Blender doesn't support alembic format so we have to use an another way to transfer animation between these applications. In this specific project I had a trex animated in maya but then I wanted to add some facial details. Since I had a very simple rig setup for the face, the quickest way to make the details, insteed to remake the rig, was to export the model with animation, import it to Blender and use the power of sculpting Shape Keys.There you can sculpt details in specific frame of the animation or with smooth brush you can fix problematic areas of the model. Really powerful and amazing tool. So lets begin. First you need to install a free plug in to export .MDD files from Maya. So go there: http://www.creativecrash.com/downloads/maya-to-houdini-particles-mdd-obj-exporter Follow instruction to install the script and open Maya This is a

Curve driving bonechain Blender

Image
Curve with wave modifier driving bones.   In this tutorial I use an easy way to create a tentacle wave like motion. Instead using keyframe animation I decide to use a wave deformer to animate the curve and then this curve to drive the bone chain.Then I bake the animation and in the end I copy the first frame to the last frame just to create a loop to use it in Unity or other game engine. So here's the steps:   Add an Armature/single bone and place it to match the model, then subdivide it as many times you want. Then add a Bezier curve : Shift+A /Curve/ Bezier and place it to bone chain. You can do it easily by selecting the last bone in Edit Mode, Shift+S / Cursor to selected and then select in Edit Mode again the Curve point of he Bezier Curve and Shift+S Selection to Cursor.Then select the Curve point with Handles and scale it to Y axes, S+Yand hit 0 to scale. Do the same for the Tip of the Curve also and the subdive

Easy walk cycle with maya.

Image
Easy walk cycle with maya.   I decide to make this tutorial because I used to had some hard times when I wanted to make a walk cycle in maya, because I wanted to be able to flip the pose of the character to animate quickly without to copy and paste channel values. So an easy way for that is to install maya bonus tools. So here's an example: After you installed bonus tools, go to bonus tools menu and in animation menu, choose Walk Cycle Control. A window will show up.There you can specify rig controls , so for Left Foot just select all left foot controllers of your character and from the press “Set” Do the same for all Controls.   Leave Cycle offset at default value 12. That means that if you set a key in frame 1 then in 12 frame will flip the pose for you and after 12 frames will set the first pose again. Prety cool right? So in frame 1 set the first pose and hit Key All. Then go to frame 6 and set the new pose and pr
Hi and welcome to my blog! Here I will post some tutorials mainly for Maya and Blender. Also I will post some works in progress, news and some benchmarks. These tutorials will not for beginners so if you have questions about something feel free to ask me. Thank you!